Indian Railways is one of the largest buyers in India. To bring transparency and speed into procurement, Indian Railways uses an online portal called IREPS (Indian Railway E-Procurement System). Through IREPS, vendors can participate in tenders for goods, works, and services across different railway zones.
If you are a manufacturer, trader, contractor, or service provider, participating in IREPS tenders can open big business opportunities. However, many beginners feel the process is complicated. Therefore, this article explains how to participate in IREPS tenders practically.
What Is IREPS?
IREPS is an official e-procurement portal of Indian Railways. It allows vendors to view tenders, submit bids, and track results online. As a result, paperwork is reduced and transparency increases. Moreover, IREPS ensures equal opportunity for all registered vendors. Consequently, even small businesses can compete with large firms.
Who Can Participate in IREPS Tenders?
Any eligible business or individual can participate, provided they meet the tender conditions. For example:
Manufacturers
Traders and suppliers
Contractors
Service providers
Startups and MSMEs
However, before bidding, you must complete registration and technical requirements.
Digital Signature Certificate: Mandatory Requirement
Before anything else, you must have a Digital Signature Certificate (DSC). Without a DSC, you cannot log in or submit bids on IREPS.
Why DSC Is Required?
It verifies your identity
It secures online bidding
It ensures the legal validity of documents
Therefore, obtaining a Class 3 Digital Signature Certificate is the first and most important step. This DSC works for IREPS, GeM, e-tendering, and other government portals also.
Step 1: Register on the IREPS Portal
Once you have your DSC, visit the official IREPS website and choose Vendor Registration. Then:
Select “New Vendor Registration”
Enter basic business details
Attach required documents
Verify using your Digital Signature
After submission, the system processes your application. Usually, approval takes a few working days.
Step 2: Log In and Search Tenders
After registration approval, log in to the IREPS portal using your DSC. Now, you can:
Search tenders by railway zone
Filter by product or service
Check tender value and deadlines
Additionally, you can download tender documents to understand requirements clearly.
Step 3: Study the Tender Carefully
Before bidding, always read the tender document properly. Pay attention to:
Eligibility criteria
Technical specifications
Earnest Money Deposit (EMD)
Bid submission deadline
Otherwise, missing even one condition may lead to rejection. Therefore, careful reading saves time and money.
Step 4: Prepare Technical and Financial Bids
Most IREPS tenders require two parts:
Technical Bid – company profile, experience, documents
Financial Bid – price quotation
Upload all documents in the prescribed format. Then, sign them digitally using your DSC. Because everything happens online, accuracy is very important.
Step 5: Submit the Bid Online
Once everything is ready:
Upload the bid
Digitally sign using Class 3 DSC
Submit before the deadline
After submission, you receive an acknowledgement. As a result, you can track bid status online.
Step 6: Bid Opening and Result
After the tender closing date:
Technical bids open first
Qualified bidders move to the financial bid stage
The lowest eligible bidder (L1) usually wins
Finally, the railway department issues a Letter of Acceptance (LOA) to the selected vendor.
Common Mistakes to Avoid
Although the process is simple, many beginners make mistakes. For example: Using an expired DSC, uploading wrong documents, Missing deadlines, ignoring tender conditions, etc. Hence, always double-check before final submission.
The Government e-Marketplace (GEM) portal is an online platform launched by the Indian government for buying goods and services. It helps government departments and public sector units to purchase directly from sellers. The portal ensures transparency, efficiency, and cost-effectiveness in procurement. Sellers, including small businesses, can register and sell their products. GEM makes government buying faster, fairer, and more accessible to all types of suppliers.
Processing CRAC in GEM Portal
CRAC stands for Consignee Receipt and Acceptance Certificate. It is a document that confirms the goods or services ordered have been received and accepted by the buyer (consignee).
This certificate is important because payment is only made after the CRAC is issued.
So in simple terms, CRAC means “We got the product, it is okay, now pay the seller.” Let’s further clarify it with the help of an example.
A government office buys 5 printers on GEM.
The supplier delivers the printers to the office.
The officer checks and finds all printers are in good condition.
The officer then generates the CRAC on GEM.
After CRAC is submitted, the payment is processed to the supplier.
Use of Digital Signature For Issuing CRAC in GEM Portal
The receiver of the product or service uses their digital signature (DSC) to issue CRAC. When a Consignee (receiver) issues the CRAC, they digitally sign the certificate on the GEM portal. This digital signature works like an electronic seal. It confirms that the consignee personally verified the goods or services, and no one else can tamper with the CRAC after it is signed. Consigee must have his Class 3 Digital Signature or get one from Apicountry.
DSC Uploading Process In GEM Portal
Uploading a Digital Signature or DSC in the GEM portal is very simple and straightforward. Follow the instructions given below to quickly add your DSC in the GEM portal.
1- Log in to the GEM portal (as a buyer) and go to the “Consignee Dashboard” section.
2- Click on “Receipt & Acceptance” or “Generate CRAC” section. You will see a list of delivered orders assigned to you. Select the order for which the goods/services have been received.
3- Check delivery details (like product name, quantity, and delivery date). Click on “Generate CRAC”. Fill in the required details in the form and proceed to sign it.
4- Now you will see the option to ‘DSC verify‘. Click on this button.
5- In the next screen, before selecting your DSC token, you need to install Embridge. Click on the link as shown in the image below to download it.
6- As you can see in the image below, the emBridge site will be open. You should download the emBridge software according to the OS of your computer. Then install it on your computer.
7- After installation, emBridhe will run in the background of your computer. Now, return to the DSC Verify page. And select your token type from the dropdown. Don’t forget to insert your DSC token before selecting the token. Next, insert your token password and choose the name of the certificate (name of receiver).
8- If everything were perfect, CRAC generation page would appear.
9- Verify everything thoroughly and click on the ‘CRAC’ button to issue CRAC.
Ensure the authorised consignee details exactly match the DSC details.
Furthermore, always use updated software to avoid certificate detection issues.
Recommended USB Tokens
The following CCA-compliant USB tokens are commonly used:
HYP2003 Token
ProxKey WatchData Token
Note (2026): Token compatibility and GeM portal requirements may change periodically. Therefore, always verify the latest guidelines before purchasing a token.
Conclusion
Issuing CRAC on the GeM portal is simple when your Digital Signature Certificate and system settings are configured correctly. Therefore, always install the latest utilities, verify browser compatibility, and ensure that the consignee details match the DSC details. Consequently, you can generate CRAC smoothly and complete the payment process without unnecessary delays.
In today’s digital world, ensuring the security and authenticity of online transactions has become essential. One powerful tool that helps achieve this is the digital signature. If you are wondering how to obtain a digital signature in India or how to apply a digital signature easily, this guide will walk you through the complete process. Let’s dive straight into it.
What is a Digital Signature?
A digital signature is an encrypted electronic stamp of authentication. It verifies the identity of the signer and ensures that the document remains unchanged after signing. In India, digital signatures are legally valid and recognised under the Information Technology Act, 2000.
Why Do You Need a Digital Signature?
You need a digital signature for various online activities. For instance, if you are filing income tax returns, registering a company, participating in e-tenders, or signing documents electronically, a digital signature becomes crucial. Furthermore, using a digital signature reduces paperwork, saves time, and ensures higher security.
Types of Digital Signatures in India
Before you learn how to apply a digital signature, you must understand its types. In India, digital signatures come in three classes:
Class 1 DSC: Verifies the user’s email ID and contact details. Mostly used for securing email communications.
Class 2 DSC: Useful for filing documents with the Registrar of Companies (ROC) and the Income Tax Department. But it is discontinued now.
Class 3 DSC: Used for participating in e-tendering and e-auctions. It offers the highest level of security. After the discontinuation of Class 2 DSC, we are using Class 3 DSC for all purposes.
Please Note : Earlier, Class 1 and Class 2 Digital Signature Certificates were available. However, they have been discontinued. As of 2026, Class 3 DSC is the standard certificate used for all major applications, including Income Tax, MCA, GST, DGFT, eTendering, ICEGATE, GeM, and other government portals.
Documents Required to Obtain a Digital Signature
To complete the process smoothly, prepare these documents in advance:
PAN Card (optional for Aadhaar verification)
Any one address proof document, like Aadhaar Card or Passport or Driving License or Voter ID.
Passport-size photograph (optional for Aadhaar verification)
A mobile number and email ID of the applicant.
Gathering these documents beforehand will help you apply without any delays.
How to Obtain a Digital Signature in India: Step-by-Step
Now, let’s understand how to obtain a digital signature easily. Follow these steps carefully to get your DSC without any hassle.
Step 1: Choose a DSC Registration Authority (RA) or Certifying Authority (CA).
First, select a DSC Registration Authority or Certifying Authority. Refer to the table below for some of the prominent RAs and CAs in India.
Since the main objective of CA is software development, they don’t actively provide an end-to-end customising solution to the public. Therefore, they appoint RAs under them. RAs are the bridge between the general public and CAs for the issuance of digital signatures and providing general services.
Each CA has its own pricing and procedure, although the basic steps remain the same.
Step 2: Select the Type and Validity
Choose the type Class 3 and the validity period. Typically, digital signatures are valid for one, two or three years only. However, you can renew them easily after expiration.
Step 3: Fill out the Application Form
Visit the RA’s website and fill out the digital signature application form. Provide accurate details like your name, address, PAN number, and contact information. Even a small mistake could cause delays, so double-check your entries.
Step 4: Complete Identity Verification
Next, complete the identity verification. You can do this either offline or online:
Offline Verification: Submit your documents physically to the RA or CA. Check the Apicountry (RA) office location to submit offline documents. But we suggest trying our secure and quick online paperless verification process.
Online eKYC Verification: Use Aadhaar-based OTP or video verification.
Online verification speeds up the process significantly. Therefore, choose it if you are comfortable.
Step 5: Make the Payment
After submitting your documents, pay the applicable fee. The cost varies depending on the class of the DSC, validity period, and the USB token you choose.
Step 6: Receive Your Digital Signature Certificate
Once the verification is successful, you will receive your digital signature. Generally, it is provided in two ways:
As per current practices, Digital Signature Certificates are generally issued only in secure FIPS-compliant USB cryptographic tokens for security reasons. Software-based downloadable certificates are no longer issued for general public use.
Loaded onto a secure USB token, known as a “cryptographic USB token.”
Using a USB token adds an extra layer of security. As a result, it is highly recommended for business or legal use.
How to Apply a Digital Signature to Documents
After you receive your DSC, you must know how to apply a digital signature to documents:
Install the DSC software or USB Token driver.
Connect your USB token to your computer.
Open the document you want to sign (PDF, Word, etc.).
Choose the “Sign” option.
Select your digital certificate.
Apply your signature and save the document.
Thus, signing documents digitally becomes effortless and secure.
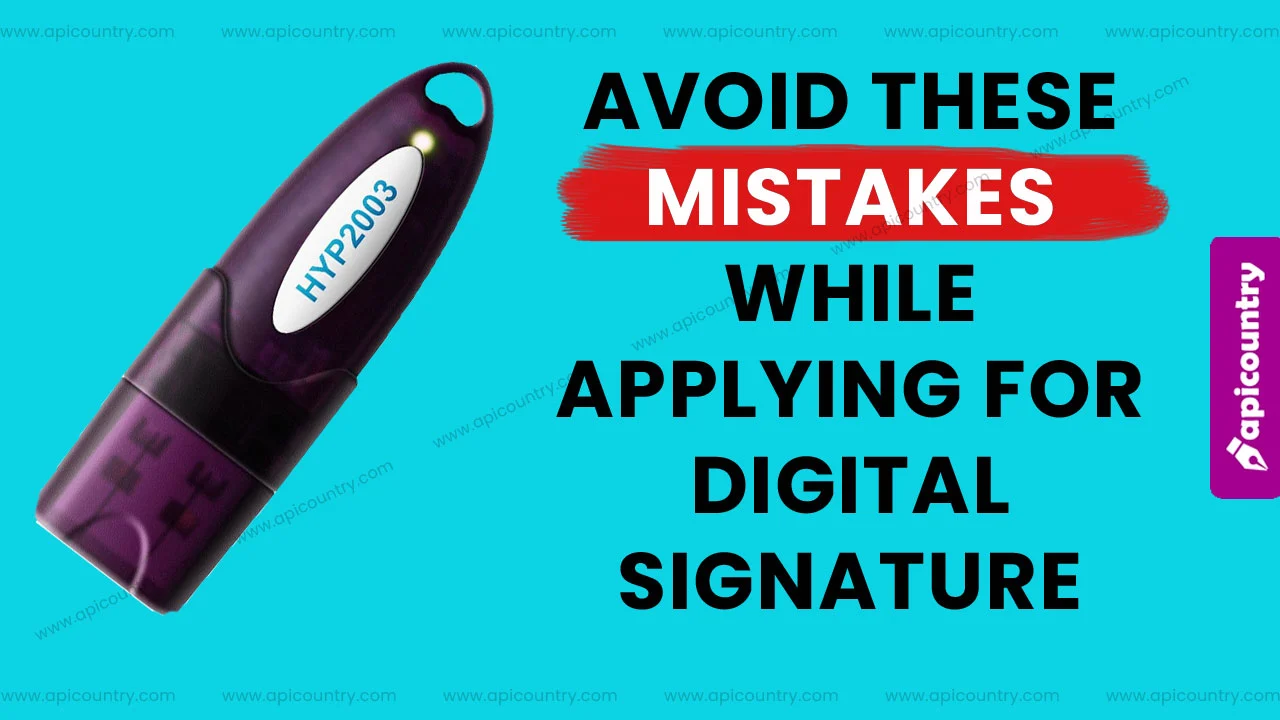
Common Mistakes to Avoid When Applying for a Digital Signature
Many applicants face delays because of small errors. To ensure a smooth experience:
Double-check your PAN and Aadhaar details.
Upload clear and legible scanned copies.
Provide a valid mobile number and email ID.
Complete video verification carefully.
By following these simple precautions, you can speed up your application process significantly.
How Much Time Does It Take to Get a Digital Signature?
Usually, if you complete your application and verification correctly, you can get your digital signature within 15 to 20 minutes. Apicountry also offer instant DSC issuance through the Aadhaar eKYC process for Individual applicants.
However, if there are discrepancies in your documents or verification, it might take longer. So, make sure you submit everything correctly the first time.
Renewal of Digital Signature
Digital signatures expire after one, two or three years, depending on your selected validity. Fortunately, renewing your digital signature is even easier than obtaining it the first time. Simply contact Apicountry or fill out our DSC renewal form online, complete any verification needed, and pay the renewal fee.
You can also choose to upgrade your DSC type during renewal if your business needs have grown. It means you can upgrade your signature only dsc to signature with encryption dsc during the renewal process. Similarly downgrade is also possible.
Is It Safe to Use Digital Signatures?
Absolutely! Digital signatures use strong encryption methods, making them highly secure. Additionally, using DSC reduces the risk of document forgery and provides a clear audit trail.
Nevertheless, you must protect your USB token or stored file. Never share your private key with anyone. Moreover, always keep your device updated with the latest security patches.
Final Thoughts
Now you know exactly how to obtain a digital signature and how to apply a digital signature in India. Whether you are an entrepreneur, a professional, or an individual needing secure document signing, getting a digital signature is no longer complicated.
Choose a reliable DSC provider like Apicountry with a very good past record and established business operation, follow the process carefully, and you will be ready to sign documents digitally in no time. Furthermore, as digital adoption grows across industries, having a DSC will soon become an essential asset.
If you found this guide helpful, share it with others who might benefit. After all, knowledge grows when shared!
As of 1 January 2025, the Indian government has made it mandatory to link Aadhaar with PAN to apply for DSC. To make a DSC, i.e., a Digital Signature Certificate, the user needs to complete his identity verification. There are two verification methods available for Individual applicants. One is PAN verification, and the other is Aadhaar verification.
PAN Verification Method
Under the PAN verification method, applicants must provide their PAN details during the application process. Subsequently, the system may verify whether the PAN complies with the applicable government requirements.
Where Aadhaar-PAN linkage is mandatory, applicants must ensure that both documents are linked before proceeding. Otherwise, the application may be delayed or rejected.
Consequently, applicants should verify their PAN status in advance to avoid unnecessary interruptions.
Aadhaar Verification Method
In the Aadhaar verification method, filling PAN details is optional. You can skip this field and use Aadhaar to complete the user’s identity verification. Click here to apply DSC without PAN.
Under this method, entering PAN details may be optional for identity verification purposes. Instead, applicants can use Aadhaar authentication to complete the verification process.
However, certain government portals may still require PAN information separately. Therefore, applicants should check the portal-specific requirements before submitting their application.
You may also apply for a DSC using Aadhaar-based verification, wherever available.
Organisation DSC
We also provide Aadhaar-based verification options for Organisation DSC applications.
Furthermore, organisations that possess a separate PAN should provide their organisational PAN details during the application process.
For authorised signatory verification, applicants may use either PAN verification or Aadhaar verification, depending on the available options and Certifying Authority requirements.
Additional Information
Moreover, applicants should ensure that their name, date of birth, mobile number, and email address match their official records. Consequently, this reduces the chances of verification failures.
Similarly, organisations should verify that the authorised signatory’s details match the information available in their supporting documents.
Why Apicountry
✔ Aadhaar-Based Verification Support ✔ PAN-Based Verification Support
AD refers to the Authorized Dealer Code. AD Code registration is an important requirement for export businesses operating internationally. In today’s digital era, businesses can easily reach global markets. Therefore, many organisations seek to expand their products and services worldwide.
At the same time, governments have established systems to protect the interests of both buyers and sellers. Accordingly, the Government of India uses ICEGATE and DGFT platforms to facilitate export-related registrations and customs procedures. In this article, we explain the AD Code registration process in ICEGATE.
What is an AD code
AD Code stands for Authorised Dealer Code. Generally, an exporter’s authorised bank issues this code. Therefore, exporters must visit their bank branch to apply for it.
An AD Code is a 14-digit numerical code issued after the bank verifies the exporter’s Import Export Code (IEC). Subsequently, the bank provides an official AD Code letter on its letterhead.
Furthermore, this code is required to register customs locations in ICEGATE and carry out export-related activities smoothly.
Note: ICEGATE requirements may change periodically. Therefore, applicants should verify the latest document requirements on the official portal before submission.
AD code registration process in IceGate
Once the exporter arranges all the above documents, he/she can proceed to the next step. That is the AD code registration in the IceGate portal. If you need professional support, feel free to contact us. Or follow the below steps to register yourself.
Open the ICEGATE Portal
Login using your user ID and password.
Go to the profile option.
Select the Bank Account option.
Upload Supporting Documents.
Choose Bank Account Management.
Select AD Code Registration.
Upload the AD Code Registration Form.
Verify it using your digital signature.
Finally, submit the application.
Approved DSC tokens for IceGate Portal.
The HYP2003 token is working perfectly in the IceGate portal. You can use it for both Class 3 and DGFT digital signatures. You can order this token from our website. You have the option to select a new token while applying for DSC.
Proxkey Watchdata is another popular token. You can also use this token to store your digital signature. It is relatively cheaper than the HYP2003 token. Proxkey tokens are also available to order on our website.
Before applying for a trademark in India, it is essential to perform a trademark search. It will reduce your financial loss and speed up the approval process. Start by checking the official trademark database on the government’s website using relevant keywords. Look for both exact matches and similar trademarks in your industry. Avoid trademarks that are too generic or already registered. Use the classification system to filter results and seek professional help if needed.
How to search for a unique Wordmark, Logo or Label
To begin, visit the official Indian Trademark website IP India. You can access the search tool in the Trademark section. Start by using keywords related to your brand. This could be the name, logo, or slogan you want to register. Don’t forget to apply the relevant class number. Check the relevant trademark class from this article.
Use different variations of the trademark. Check for any trademarks that look similar. Don’t forget to check for phonetic similarities. A name that sounds like another might also cause confusion. The Trademark Registry may reject confusingly similar trademark applications.
Use the classification system on the website. This helps narrow down results to your industry. It’s important to only focus on trademarks that match your business area. For example, if you’re in fashion, look within the relevant classes for fashion only.
Next, search for both registered and pending trademarks. Make sure to review the status of each trademark. If a trademark is already registered, avoid using it. If it’s pending, check for any possible conflicts.
You should also check for common words or phrases. Avoid using generic terms that can’t be trademarked. A distinctive trademark is easier to protect and register.
To get more detailed results, use professional trademark search tools. These tools offer a more thorough and accurate search. They can help find trademarks not listed on the government website.
If you’re unsure, consider seeking professional help. A professional can assist with the search and legal advice. They can also help in interpreting search results and avoid errors.
Finally, if you find a similar trademark, consider modifying yours. Small changes can make your trademark unique and avoid conflicts. A well-researched trademark helps in the smooth registration process.
DSC Tokens list that are compatible with new Digital signature. Class 3 DSC is suitable for Trademark application.
Digital Signature certificates are becoming increasingly popular. Almost all government online form submissions require them. From company registration to tax filing, you need DSC everywhere. But did you know that more than 27% of people make mistakes while applying for a DSC? Today we discuss some of the common mistakes people make while applying for a DSC
Forgot to enter the PAN number
While making DSC it asks to enter PAN number. It may not be mandatory for every DSC category; however, it is strongly recommended and, in many cases, required for Income Tax portal usage.. Therefore many people do not fill it. Sometimes they forget to enter it as no error message or alert not popup by the system. Because it is not a mandatory field no system-generated alert appears. But you should know that sometimes DSC won’t work without a PAN number. Portals like the Income Tax of India, mandatorily ask for a DSC with PAN number in it. So next time you order a DSC, don’t forget to insert your PAN.
Wrong mobile number and email ID
While applying for DSC, some people enter a mobile number that doesn’t belong to them. Many people don’t have their email IDs, so they enter one belonging to their relatives or friends. In some cases, applicants unintentionally provide another person’s mobile number or email address to expedite the application process. But you should avoid these common mistakes. All future correspondence will be shared with the registered mobile number and email IDs. A wrong personal detail will cost you more in case you lose the DSC or want to re-issue it. Therefore always give your own mobile number and email ID while applying for DSC.
Wrong DSC type
This one is the most common case. People do order DSC without knowing their application. Each work has its own DSC requirement. Similarly, Individual DSC orders were mistakenly placed for Organisation One. Mistakes like this can make you re-apply for fresh DSC. Once a DSC is issued, its core applicant details cannot be modified. Therefore, users must apply for a fresh DSC if incorrect information is submitted.
Additional Tip
Before placing an order, always verify the intended use of the DSC. For example, determine whether you need a Class 3 DSC, DGFT DSC, Foreign National DSC, or a Document Signer Certificate.
Additionally, confirm the applicant category, validity period, and USB token compatibility to avoid unnecessary delays.
How Apicountry Helps
Apicountry offers a completely paperless DSC application process. Furthermore, applicants can complete Aadhaar, PAN, and Video KYC verification online without submitting physical documents.
Additionally, we provide Class 3 DSC, DGFT DSC for IEC holders, Foreign National DSC, and Document Signer Certificates, along with end-to-end application support.
Conclusion
DSC verification procedures, portal requirements, and Certifying Authority guidelines may change over time. Therefore, applicants should always verify the latest requirements before submitting an application.
Getting the right digital signature for the Indian Income Tax portal is very important. The DSC solves two major requirements. First is signing the final submission and second is logging in to the IT portal in case one forgot his password. During the submission of audit reports, a DSC is also required. Therefore one should choose a perfect DSC that can work seamlessly.
Filing income tax returns in India involves navigating through numerous rules and regulations. One significantly important aspect is the use of digital signatures during form submission. Digital signatures enhance the security and authenticity of the documents submitted electronically, and they are gradually becoming a crucial component of online tax filing.
What Is a Digital Signature?
A digital signature serves as an electronic signature that verifies the authenticity of electronic documents and transactions. It provides the same legal standing as a handwritten signature. Using mathematical algorithms, digital signatures create a unique code for each document. This code ensures the document’s integrity and helps verify the signer’s identity.
What type of DSC is suitable for ITR filing?
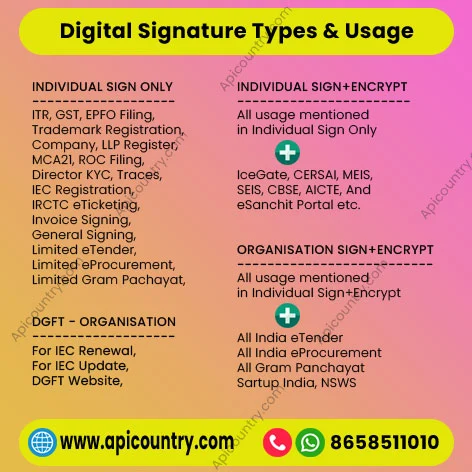
A Class 3 Sign-only DSC is perfect for the ITR portal. It’s also known as general purpose DSC which we can use for all major signing work. Refer to the image below to understand the general usage of this certificate.Class 3 DSCs are generally available with validity periods ranging from 1 year to 3 years, subject to the policies of the respective Certifying Authority. Select the one as per your requirement.
Digital Signature DSC types and their usage.
How to Obtain a Class 3 Digital Signature Certificate (DSC) ?
Anyone can buy a Class 3 digital signature using this link. However during placing an order, one should provide his PAN number. Otherwise, the certificate may not work properly. PAN details are strongly recommended and, in many cases, required for DSCs intended for Income Tax portal usage. Therefore, you should give it without fail although it is not compulsory to make DSC.
We have made the DSC application process very smooth and easy. Just follow the 4-step method as given below to get one for your IT filing job.
Digital Signature Application Process.
Application process of DSC
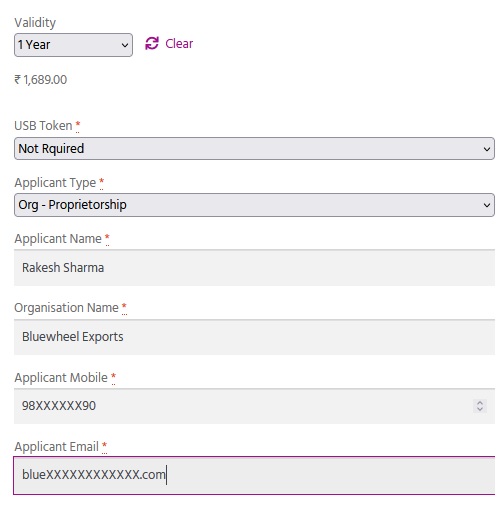
Select the right DSC, Choose validity, USB token option etc.
Fill in the form with applicant details and PAN no.
Click on ‘Add to cart’ button and then complete the order on the checkout page by making a fee payment.
A verification link will be sent to complete the email, mobile & video verification of the applicant.
Alternatively, share some basic documents so we can process it on your behalf. It will reduce your stress and headache of minor errors in DSC making.
Finally, record your video for DSC. Wait some time till approval.
Boom!! now your DSC is ready for download and further use.
A digital signature for the DGFT portal is mandatory for businesses dealing with exports and imports. DGFT (Directorate General of Foreign Trade) made it compulsory for all organisations to upload documents with valid digital signatures. It will ensure proper authenticity verification of the user and their records. Organisations can buy a DGFT Digital Signature from DSC providers like Apicountry.
IEC itself does not expire. Businesses are required to confirm or update IEC details annually on the DGFT portal. IEC may become deactivated if annual confirmation or updating is not completed within the prescribed timeline.
Apply DGFT Digital Signature
To apply for a DGFT Digital Signature, the organisation should have an Import Export Code (IEC) Certificate. IEC is a unique number assigned to all registered organisations in the DGFT portal. If an organisation want to register on the DGFT portal for the first time, they must buy a Class 3 Digital Signature. Refer to our article on how to purchase Class 3 digital signature for more details.
Step 1: To purchase DGFT DSC, submit a simple form as shown below.
Step 2: After placing an order, you will receive a mobile and email verification request. It is a very simple OTP verification and can be completed without any issues.
Step 3: Then complete the video verification of the applicant. During video verification, the applicant needs to show available original documents on camera.
Step 4: Once the video gets approval, the applicant needs to complete the final step, downloading digital signature in a DSC token. You can now use the DSC after downloading.
Our executive will assist you in all the steps given above. So that you will experience a smooth application process.
DSC Registration Process
DSC registration process is straightforward in the DGFT portal.
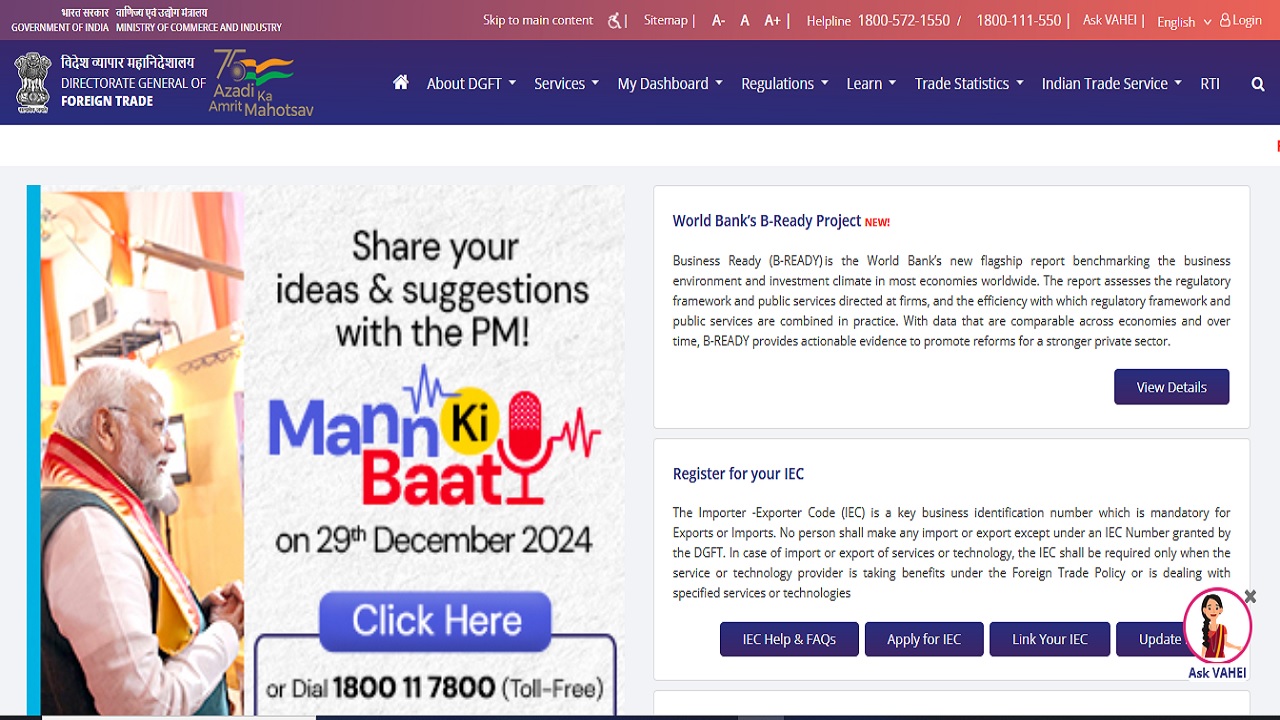
Visit DGFT’s official site.
Login to the DGFT portal using your user ID and password.
After successful login, the user dashboard will appear.
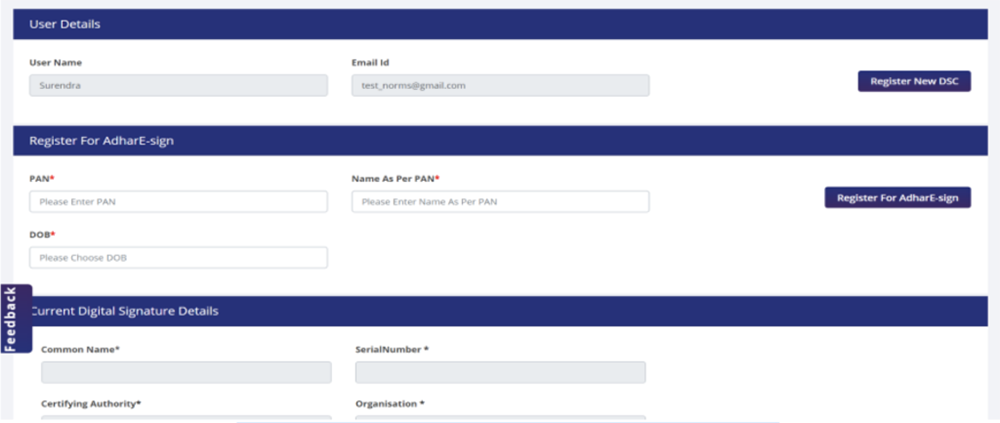
Click on the ‘My Dashboard’ drop-down menu and select ‘View and Register DSC’.
Scroll down till you see the ‘Register New DSC’ button.
Click on the ‘Register New DSC’ button to upload your DSC.
NSWS refers to the National Single Window System of the Government of India. NSWS portal facilitates the application, approval, and registration of various licenses and permissions required for investments and business setup in India.
Identify the required pre-establishment and pre-operation approvals for setting up a business unit in India.
Apply for the suggested approvals online.
Store approval-related documents in a digital repository.
Pay processing fees for various approvals.
Track submitted applications and receive status updates.
Renew approvals online, wherever applicable.
Access information related to timelines, fees, and required documents.
Digital Signature for NSWS Portal
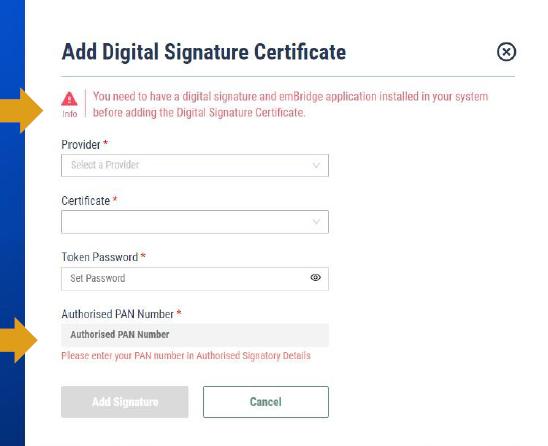
To take benefit of NSWS, a valid Digital Signature is required. A DSC ensures confirmation of the applicant’s authorization in the application process. Follow the steps below to register your DSC on the NSWS portal.
Run the necessary connecting application from the NSWS portal.
Open the Common Registration Form in the NSWS portal.
Proceed to add Authorised Signatory Details with the correct PAN as in DSC.
Click on the ‘Add’ button to register the DSC.
On the next screen select Apicountry Token from the dropdown list ‘Provider’.
Once the token is selected, DSC will be displayed in the ‘Certificate’ Field.
Then enter the token password and click the ‘Add Signature’ button.
Important Note
Portal interfaces, DSC providers, and registration procedures may change over time. Therefore, users should always follow the latest instructions available on the NSWS portal.